Installation
Install the core plugin on WordPress/WooCommerce, OpenCart 3.0.4+ / 4, PrestaShop or Shopware 6, then activate your license. Takes about five minutes.
Jump to: Before you start · WordPress · OpenCart 4 · OpenCart 3.0.4+ · PrestaShop · Shopware 6 · First run · Install addons · Server packages
Before you start
| Platform | Requirements |
|---|---|
| WordPress / WooCommerce | WordPress 6.0+, WooCommerce 6.0+ installed and active, PHP 8.0+ |
| OpenCart | OpenCart 4.x or 3.0.4.0+, PHP 8.0+ |
| PrestaShop | PrestaShop 8.0 – 9.x, PHP 8.0+ |
| Shopware | Shopware 6.6 or 6.7 with the default Storefront theme (or a theme that extends it), PHP 8.2+ |
- The PHP GD extension and a writable uploads/image folder. Add ZipArchive to upload addon ZIPs and Sodium so official addons are recognized as verified. Optional production tools are covered in the server package guide.
- For ZIP uploads, your server's
upload_max_filesizeandpost_max_sizeshould be at least 16 MB (the core OpenCart package is about 4 MB; addons are up to 2 MB). Veyo tells you the current limit before sending a file that is too big. - HTTPS is strongly recommended.
- Your purchase email from Polar: it has the download link and your license key. Both are always available again from the customer portal.
WordPress / WooCommerce
-
Install WooCommerce first
Veyo needs WooCommerce. WordPress 6.5+ blocks activation if it's missing; older versions activate but show an error notice.
-
Download the plugin ZIP
Download
veyo-product-personalizer-vX.Y.Z.zipfrom your Polar purchase email. Don't unzip it. Every download also contains the full source; seePACKAGE-README.mdinside the ZIP for rebuild steps. -
Upload and activate
Go to Plugins → Add Plugin → Upload Plugin (Add New Plugin on WordPress before 6.9), choose the ZIP, click Install Now, then Activate Plugin. A Veyo Personalizer menu appears in the admin sidebar and you land on the Home dashboard.
-
Activate your license
Open Settings → License & Updates, paste your key and click Activate. See License & activations.
OpenCart 4
-
Unzip the download
Unzip
veyo-opencart-4-vX.Y.Z.zipon your computer. Inside isveyo.ocmod.zip. Keep that exact file name. -
Upload it in the Installer
Go to Extensions → Installer, upload
veyo.ocmod.zipand click Install. -
Install the module
Go to Extensions → Extensions, choose Modules from the type list, find Veyo Product Personalizer and click the green Install button. A Veyo Personalizer menu appears after Catalog.
-
Give other admins access (optional)
For user groups other than the main administrator, go to System → Users → User Groups and grant access and modify on
extension/veyo/module/veyo. Veyo adds its own API permission when the page is opened. -
Activate your license
Open Veyo Personalizer → Settings → License & Updates, paste your key and click Activate.
OpenCart 3.0.4+
Veyo runs on OpenCart 3.0.4.0 and later (older 3.0.x releases need PHP 7 and are not supported). The OpenCart download includes a separate package for it.
-
Unzip the download
Unzip
veyo-opencart-3-vX.Y.Z.zipon your computer. Inside isveyo.ocmod.zip. -
Upload it in the Installer
Go to Extensions → Installer and upload
veyo.ocmod.zip. OpenCart copies the files and adds the Veyo modification. -
Refresh modifications
Go to Extensions → Modifications and click Refresh (top right). Until you do, personalized products are charged their plain price; the Veyo page shows a warning.
-
Install the module
Go to Extensions → Extensions, choose Modules, find Veyo Product Personalizer and click the green Install button. A Veyo Personalizer menu appears after Catalog. Other admin groups need access and modify on
extension/module/veyo. -
Activate your license
Open Veyo Personalizer → Settings → License & Updates, paste your key and click Activate.
PrestaShop 8 / 9
-
Upload the module
Go to Modules → Module Manager → Upload a module and drop
veyo-prestashop-8-9-vX.Y.Z.zipin the dialog. PrestaShop installs it automatically. -
Open Veyo
A Veyo Personalizer entry appears under Sell. Use the sidebar link rather than typing the admin URL: PrestaShop may otherwise show an “Invalid token” page, in which case click I understand the risk.
-
Activate your license
Open Settings → License & Updates, paste your key and click Activate.
Shopware 6.6 / 6.7
-
Upload the extension
Go to Extensions → My extensions → Upload extension and choose
veyo-shopware-6-vX.Y.Z.zip. The row Veyo Product Personalizer appears in the list. -
Install and activate
Click Install, then switch it to Active. Then open Settings → System → Caches & indexes and click Clear caches so the storefront picks up the designer.
-
Open Veyo
A Veyo Personalizer entry appears under Products. Every product and order also gets a Veyo tab. Staff who are not administrators need a role with the Veyo Personalizer viewer or editor permission.
-
Activate your license
Open Settings → License & Updates inside Veyo, paste your key and click Activate.
To link a store product, open it in Products → Overview, go to its Veyo tab and pick (or create) the catalog product. The designer button then shows on the product page, and designs travel through the Shopware cart, order and order emails. Try it on the Shopware demo.
custom/plugins/, then run bin/console plugin:refresh, bin/console plugin:install --activate VeyoPersonalizer and bin/console cache:clear.First run: the setup checklist
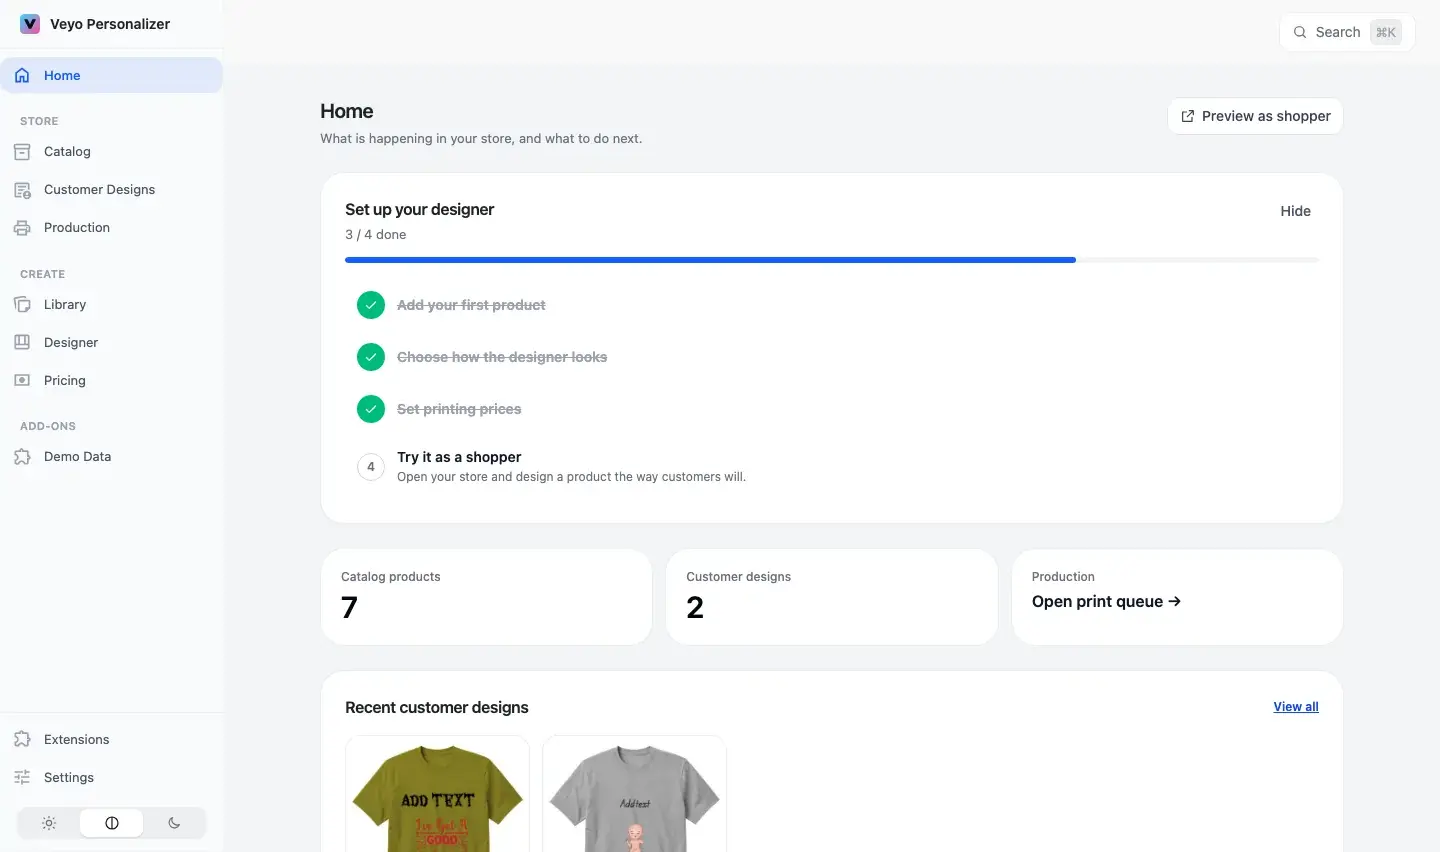
The first time you open Veyo, the Home dashboard shows a short checklist. Work through it top to bottom:
- Create a catalog product (Catalog → Products → New product).
- Add a view with a mockup photo.
- Draw a print area and enter its real-world size.
- Link the catalog product to a product in your store.
- Open the product on your storefront and click Design this product.
Full walkthrough with a test order: Your first product. The Home page also checks your server and flags missing packages.
Install addons
Addons are optional extensions. Free ones install with one click; paid ones come as a signed ZIP with a license key.
-
Open the addon screen
On every platform: Veyo Personalizer → Extensions.
-
Upload ZIP
Click Upload ZIP and choose one or several addon ZIPs at once. No FTP needed. On PrestaShop the signed-in employee must be a SuperAdmin; on OpenCart the user needs modify permission on Extensions → Installer.
-
Switch it on
New addons install disabled. Veyo asks if you want to enable them right after the upload; you can also use the toggle on the addon card.
Prefer FTP? Copy the addon folder into modules/veyop/core/plugins/ (PrestaShop) or extension/veyo/system/library/veyop/core/plugins/ (OpenCart). Uploaded and FTP-added addons survive a core update. Browse the addon catalog.
Server packages and extensions
Only the first group is required for the designer. Add production tools when your workflow actually exports server-rendered raster, CMYK, or PDF/X files. Open Veyo → Dashboard after every server change: it separates core failures from package-management checks and optional production warnings.
| Group | Package | Used for |
|---|---|---|
| Core | GD | Normal image handling, previews, and baseline designer operation. |
| Packages | ZipArchive | Opening addon ZIPs and production download archives. |
| Packages | Sodium | Ed25519 verification of official addon signatures (marks a package as Official). |
| Optional production | ImageMagick CLI or Imagick | Server-made print files: TIFF, CMYK TIFF, PDF/X, the customer’s print download and addon print files. Needs librsvg and PHP exec() as well. Not needed for Download PNG, which your browser renders. |
| Optional production | librsvg / rsvg-convert | SVG-to-raster rendering for those exports. Needs ImageMagick or Imagick as well. |
| Optional production | Ghostscript | PDF/X output only. |
| Optional production | CMYK ICC profile | Certified CMYK TIFF and PDF/X color conversion. |
cPanel, Plesk, and shared hosting
- Switch the site to PHP 8.x in MultiPHP Manager, Select PHP Version, or Plesk PHP Settings.
- Enable
gd,zip/ZipArchive,sodium, and—if your host offers it—imagick. - Save/apply the PHP configuration. Managed panels normally restart the correct PHP handler automatically.
- If an extension is not listed, ask the host to enable it. On shared hosting you normally cannot install
rsvg-convertor Ghostscript yourself. - Return to Veyo → Dashboard and reload the checks.
exec(). Many shared hosts list exec in PHP disable_functions. Veyo then cannot run rsvg-convert, ImageMagick or Ghostscript even when they are installed, and the Dashboard reports them as unavailable. Ask the host to remove exec from disable_functions.exec(). The Download PNG button on the order’s production page renders the file in your browser instead, at 300 DPI, from the print-area size in cm, and Download SVG and PDF are made there too. Only server-made files need the tools: TIFF, CMYK TIFF, PDF/X, the customer’s print-file download, and print files from Print Queue, Make It Mine and Team Names. Above roughly 53 × 53 cm the browser PNG drops below 300 DPI and the page tells you; use SVG or PDF for those.Debian or Ubuntu
sudo apt update
sudo apt install php-gd php-zip php-common imagemagick librsvg2-bin ghostscript
php -m | grep -Ei 'gd|zip|sodium|imagick'
rsvg-convert --version
gs --version
Sodium is part of modern PHP builds; php-common normally provides it. If you use PHP-FPM, restart the installed service version, then restart or reload the web server:
sudo systemctl restart php8.3-fpm
sudo systemctl reload nginx   # or: sudo systemctl reload apache2
RHEL, Rocky Linux, AlmaLinux, or Fedora
sudo dnf install php-gd php-zip php-sodium ImageMagick librsvg2-tools ghostscript
php -m | grep -Ei 'gd|zip|sodium|imagick'
rsvg-convert --version
gs --version
sudo systemctl restart php-fpm
sudo systemctl reload nginx   # or: sudo systemctl reload httpd
Package names vary between the distribution repositories and Remi streams. Use the package matching the PHP version that serves WordPress—not a second command-line PHP installation.
macOS local development
brew install php imagemagick librsvg ghostscript
php -m | grep -Ei 'gd|zip|sodium|imagick'
rsvg-convert --version
gs --version
Restart Valet, Herd, Local, MAMP, or your PHP-FPM service after changing PHP. A Homebrew CLI package does not automatically enable the Imagick PHP extension; Veyo accepts either Imagick or the ImageMagick CLI.
What happens when a package is missing?
| Missing | Impact | Still works |
|---|---|---|
| GD | Core image workflows are unsupported. | Fix before using Veyo in production. |
| ZipArchive | Addon ZIP install and ZIP-based downloads fail. | Designer pages already installed can load. |
| Sodium | Addon ZIPs cannot be verified, so they install as Custom builds. | Core designer and existing addons continue. |
PHP exec() (disabled by the host) | No server tool can run: TIFF, CMYK TIFF, PDF/X, the customer print download and addon print files are refused. | Designer, previews, and Download PNG (300 DPI), SVG and PDF on the order’s production page, all made in your browser. |
| ImageMagick / Imagick | Server-made TIFF, CMYK TIFF and PDF/X exports are refused. | Designer, previews, and Download PNG (300 DPI), SVG and PDF, made in your browser. |
| rsvg-convert | Server-made TIFF, CMYK TIFF and PDF/X exports are refused, with a message that librsvg is needed. | Designer, previews, and Download PNG (300 DPI), SVG and PDF, made in your browser. |
| Ghostscript | No PDF/X output. | Designer, previews, SVG, PNG, TIFF, and non-PDF/X workflows. |
| CMYK ICC profile | No certified CMYK TIFF/PDF-X conversion. | RGB output and normal designer workflows. |
After installing packages and restarting PHP/web services, reload Veyo → Dashboard. A yellow optional warning is informational; a red core requirement needs action.
Server hardening (nginx)
Veyo protects its media folder with .htaccess files. nginx ignores them, and so does LiteSpeed without .htaccess support, so add the same rules to your server config. Veyo's media folder is:
| Platform | Media folder |
|---|---|
| WordPress / WooCommerce | /wp-content/uploads/veyo-product-personalizer/ |
| OpenCart 3.0.4+ / 4 | /image/catalog/veyop/veyo-product-personalizer/ |
| PrestaShop 8/9 | /img/veyop/veyo-product-personalizer/ |
| Shopware 6.6 / 6.7 | /veyop/veyo-product-personalizer/ |
Block private folders. On OpenCart, PrestaShop and Shopware new files already go to private storage; the rule covers older ones.
location ~* /veyo-product-personalizer/(orders|export-fonts|icc-profiles)/ {
    deny all;
    return 404;
}
Sandbox uploaded SVG files.
location ~* /veyo-product-personalizer/.+\.svgz?$ {
    add_header Content-Security-Policy "default-src 'none'; img-src 'self' data: https:; style-src 'unsafe-inline'; font-src 'self' data: https:; sandbox" always;
    add_header X-Content-Type-Options "nosniff" always;
}
nginx uses the first regex location that matches, so keep the first block above the second and both above your static-file rules.
Allow large designs. Designs carry their fonts and images, so they can be large.
client_max_body_size 64m;Also set PHP post_max_size and upload_max_filesize to at least 64M, and MySQL max_allowed_packet to at least 64M.