Home › Docs › Addons › Embroidery Pack

Embroidery Pack
$13 Realistic embroidery stitch rendering with deterministic production export.
Every purchase is a single signed, install-ready ZIP that also includes full TypeScript/Vue source, sourcemaps, and build tooling (npm ci && npm run build) if you want to customize it yourself. Installs and updates through the in-app addon marketplace.

What Embroidery Pack does
Embroidery Pack adds embroidery as a print method for your store: a live stitch rendering (satin and fill stitches with an optional thread sheen) shows customers a realistic preview of how their design will look stitched, not just printed flat.
Export is deterministic: the stitch texture is generated from a seed stored with each design item, so the same design always produces the same result and what the customer previewed is what goes into the production file. The production output is a stitch-textured image of each design view plus a data record of sizes, thread colors and estimated stitch counts. It is not a machine stitch file (for example DST), so your embroidery software still digitizes from it.
How to enable Embroidery Pack
-
Buy the addon
Your Polar purchase email (and the Polar customer portal) contains the addon ZIP.
-
Upload it in the Veyo Apps screen
Open Veyo → Extensions and upload the ZIP. Veyo verifies the package and installs it.
-
Enable it
Toggle Embroidery Pack on. Then create an embroidery printing method and turn it on for the products you want to offer it for (see below).
How to use Embroidery Pack
-
Create an embroidery printing method
Open Pricing → Printing & Pricing (requires the Printing & Pricing addon), click New printing method or start from the Embroidery starter, and set Production pack to Embroidery. Price it with a setup fee and per-item tiers like any other method.
-
Turn it on for a product and a side
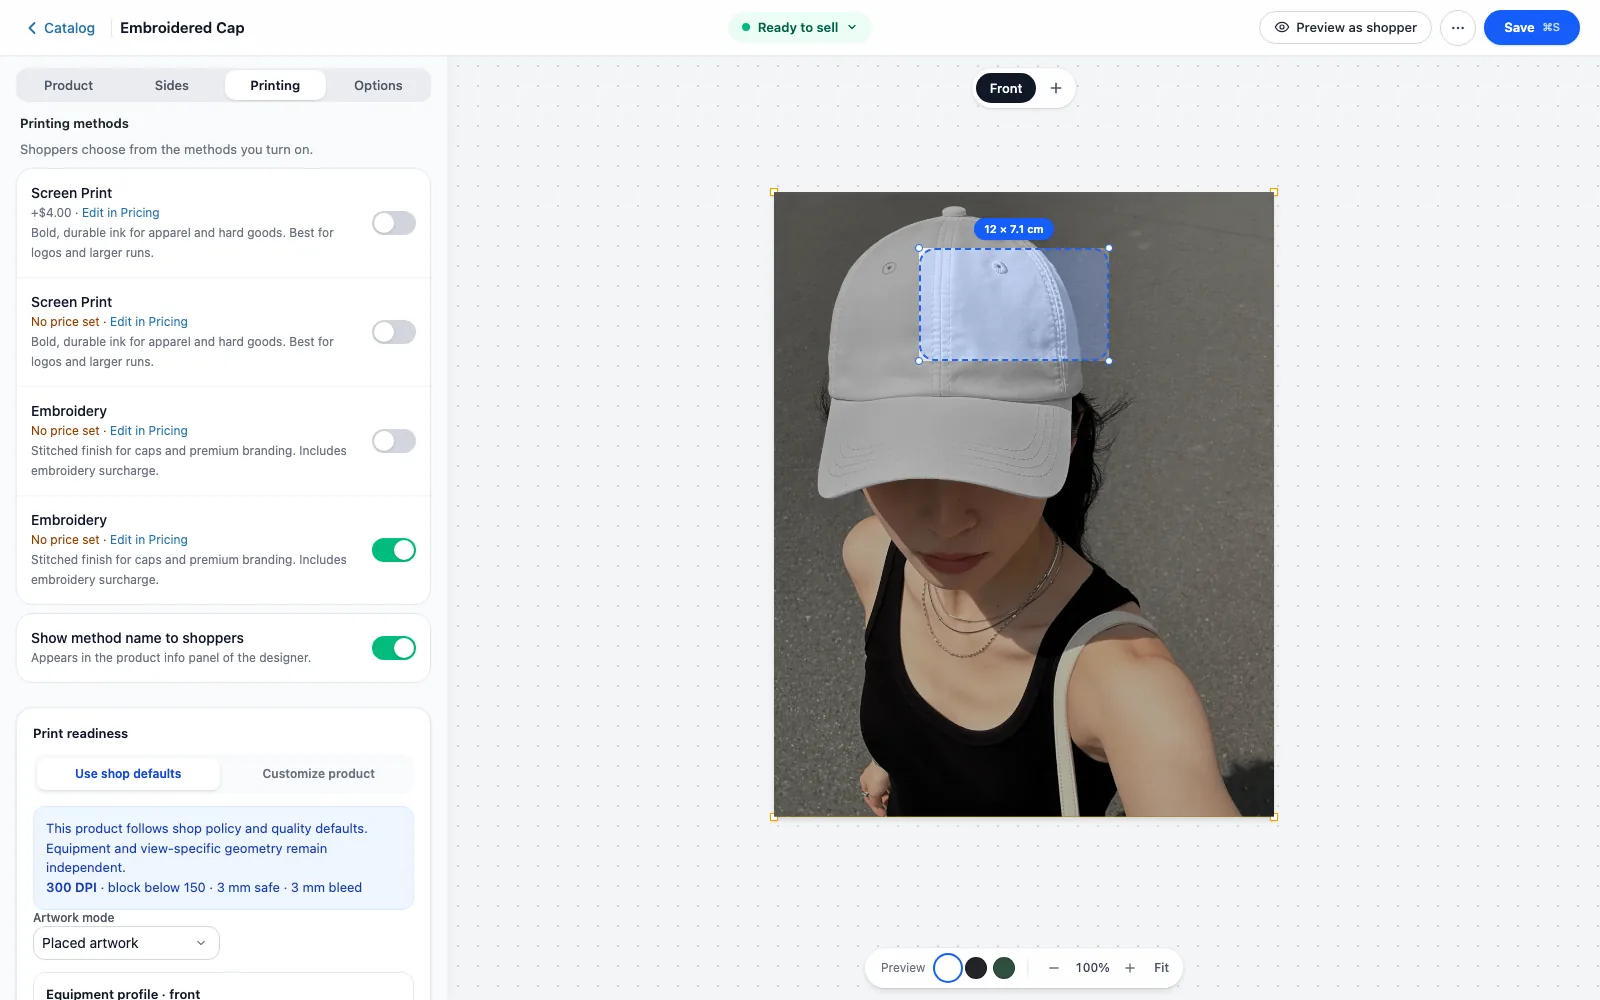
Open the product under Catalog → Products and tick the method under Printing methods. An Embroidery panel then appears in the printing section. Switch on Embroider the Front side (or Back, Left, Right) and set the defaults and limits described below. Embroidery is off for every side until you do this.
-
Customer previews the stitch render
When the embroidery method is selected on a side where it is enabled, text, images and clipart on the canvas are drawn as stitches. If embroidery is the product's only printing method, it is selected automatically.
-
Export production files
When the design is added to the cart, Veyo records an embroidery production manifest with the size in millimetres, thread color, density, stitch angle and estimated stitch count of every item, and a stitched image per design view. See Orders & production files.
At a glance
| Version | 1.0.8 |
|---|---|
| Platforms | WordPress / WooCommerce, OpenCart 3 & 4, PrestaShop 8 & 9, Shopware 6.6 / 6.7 |
| Requires | Veyo Product Personalizer 1.9.1 or later. No required addons. To price embroidery, use Printing & Pricing: the Embroidery production pack is selected on a printing method there. |
| Where settings live | Per product and per side: Catalog → Products → edit product → Embroidery panel. The method itself is created in Pricing → Printing & Pricing (Production pack: Embroidery). |
| Server tools / outside services | None. The stitch rendering runs in the shopper's browser. |
What shoppers see
- A stitched preview. With the embroidery method selected on a side where it is enabled, text, uploaded images and clipart are drawn as stitches in your thread color, with an optional thread sheen (Thread texture in preview, preview only).
- Defaults inside your limits. The thread color, stitch density and stitch direction used for a design start at the defaults you set and are always kept inside the allowed ranges.
- Checks before checkout. The designer flags designs that cannot be sewn. Problems marked as errors block add to cart; warnings only inform.
| Message in the designer | Type | Quick fix offered |
|---|---|---|
| Embroidery is disabled for this product view. | Error | None. Enable the side in the product, or choose another method. |
| Embroidery exceeds the configured hoop bounds. | Error | Fit inside hoop |
| Embroidery density is below / exceeds the configured customer range. | Error | Reset to allowed range |
| Embroidery stitch angle is outside the configured customer range. | Error | Reset to allowed range |
| Embroidery area is below the configured minimum detail size. | Warning | None |
| Opaque image background may produce a rectangular stitch field. | Warning | None |
Settings
Open the product under Catalog → Products. The Embroidery panel is set per side (Front, Back, Left, Right) and only becomes available once a printing method with the Embroidery production pack is turned on for that product; until then it shows Two steps to turn on embroidery.
| Setting | Default | Range / options | What it does |
|---|---|---|---|
| Embroider the Front side (per side) | Off | On / off | Turns embroidery on for that side. Off: shoppers cannot choose embroidery for designs on it. |
| Thread color | #1a1a1a | A color from your Brand Colors policy (or any color when the policy allows it) | Thread color used for new text and artwork. |
| Stitch density | 1.0× | 0.5× to 2.0×, step 0.1 (Light, Standard, Dense) | Default density. Higher means fuller color but stiffer fabric and longer sewing. |
| Stitch direction | 25° | 0° to 180°, step 5 | Angle of the fill stitches. |
| Thread texture in preview | On | On / off | Thread sheen in the preview only. It does not change the production file. |
| Density range | 0.5× to 2.0× | Within 0.5× to 2.0× | The limits of the designer sliders. Set min and max equal to lock the value. |
| Direction range | 0° to 180° | Within 0° to 180° | Same, for the stitch direction. |
| Hoop size | 200 × 200 mm | 1 to 2000 mm each; presets 100 × 100, 130 × 180, 200 × 200, 300 × 300 | Designs larger than the hoop cannot be ordered. |
| Smallest detail | 8 mm | 0 to 100 mm | Text or shapes smaller than this get a warning. |
What you get in orders and production
- Production manifest. Each order line keeps a record for every text, image and clipart item: view, size in mm, thread color, density, stitch angle, estimated stitch count and, for text, its color.
- Stitched image per view. A production image of each design view is generated with the stitch texture. This is an image, not a machine stitch file.
- Server re-check (WordPress). The server sanitizes the manifest and recomputes the embroidery checks above from your catalog limits, so the numbers a browser sends cannot loosen them. The Print Preflight addon, if installed, folds these results into its report.
See Orders & production files for where to download the files.
Data and privacy
- Stored: no tables of its own. The per-side limits live in the product's design settings (
embroidery_profile), and the manifest is saved with the order line. - Shopper data: only the design itself (items, sizes, colors). No personal data is added by this addon.
- Outside services: none.
- Uninstalling the addon keeps your product settings and orders. Uninstalling the whole of Veyo with Keep data when uninstalling off removes all
veyop_*data. See Uninstalling & your data.
Troubleshooting
- No Embroidery panel in the product. Create a printing method with Production pack set to Embroidery in Printing & Pricing, then tick it on the product.
- Designs still look flat. Check that the embroidery method is selected in the designer and that the side is switched on (Embroider the ... side). Otherwise the designer shows Embroidery is disabled for this product view.
- “Embroidery exceeds the configured hoop bounds.” The design is larger than the hoop size. The shopper can click Fit inside hoop, or you can raise the hoop size to match your machine.
- Density or direction errors. The value is outside the allowed range. Reset to allowed range brings it back, or widen the range in the panel.
- “Opaque image background may produce a rectangular stitch field.” The image has a solid background. Use a transparent PNG or remove the background first.
More help: Troubleshooting & FAQ and the Admin guide.
FAQ
Will the same design always export identically?
Yes — the stitch engine is deterministic, so re-exporting the same design produces the same output every time, which is important for re-runs and quality control.
Does embroidery pricing need a separate addon?
Embroidery Pack handles rendering and export. Combine it with Printing & Pricing (and optionally Dynamic Pricing) to price the embroidery method itself.
Installing, updating and removing
- Install: upload the ZIP in Extensions, then enable it. See Install addons.
- Update: upload the newer ZIP over the old one. Settings and data are kept. See Upgrading.
- Remove: Uninstall on the addon card removes its files and keeps its data, so reinstalling restores everything. See Uninstalling & your data.